Traffic Manager Workflow
Once a patient is in a Treatment Room, you have many options available using the right-click menu:
Edit Details – This brings up the Room Patient window for editing.
Completed – Once the appointment is complete, this moves the patient out of the Traffic Manager.
Send to Wait Room – Use this option to move the patient back to the Waiting Room.
Claim Details – This opens the Claim Details window (the bill) for the current visit.
Appointment History – This shows the patient's Quick Patient Appointment View window (also accessed using F4 on the keyboard).
Go to EMR – This opens the patient's EMR.
Virtual Chart – This opens the Quick Patient Summary window (also accessed using F3 on the keyboard).
Tasks – This opens the Patient Tasks window (also accessed using F7 on the keyboard).
Clear Notifications – Clears the avatar assigned to the patient after he has entered the treatment room (if your office has avatars assigned to treatment rooms)
Remove – Removes the patient from the Traffic Manager.
Validate Health Card (ON) – Validates a patients Health Card (if your office has the ON Health Card Validation Module enabled).
Mark a Patient as Arrived in Traffic Manager
Mark a patient as arrived in the Scheduler (see Mark a Patient as Arrived) this procedure is to mark a patient as arrived and show them Traffic Manager as being in your waiting room from within the Traffic Manager:
- Click the Traffic button
 on the Accuro Navigation bar.
- Click the Add button
 .
.
- Select a patient from the list. This list shows all patients that have booked appointments in the Scheduler.
or:
If the patient is in Accuro, search for the patient using the Search Tool.
or:
If the patient is not in Accuro, click New Patient to add a new patient, enter the information required and click Add.
- Complete the New Patient window:
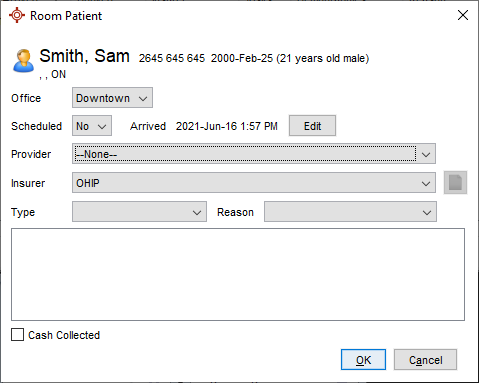
- Edit the Arrived time if required.
- Select a Provider, Insurer, Type, and Reason, if required.
- Type any notes into the text box.
- If the patient has already paid for the visit, click the Cash Collected checkbox.
- Click OK to save the details and mark the patient as arrive.
Edit a Patient in Traffic Manager
- Click the Traffic button on the Accuro Navigation bar.
- Click a patient in the Waiting Room to select them.
- Click the Edit button
 .
.
Note: A shortcut is to right-click on the appropriate patient and select Edit Details from the list displayed.
- Make any changes as required.
- Click OK to save any changes.
Remove a Patient from the Waiting Room / Treatment Room
- Click the Traffic button on the Accuro Navigation bar.
- Click on a patient in the Waiting Room or Treatment Room to select them.
- Click on the Delete button
 . Alternatively, right-click on the selected patient and select Remove from the list displayed.
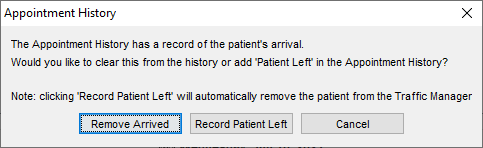
A confirmation message is displayed:
-
Select Remove Arrived or Record Patient Left.
Note: clicking 'Record Patient Left' will remove the patient from the Traffic Manager".
Assign a Provider to a Room
- Click the Traffic button on the Accuro Navigation bar.
- Select a Provider from the Provider dropdown list located on each room:
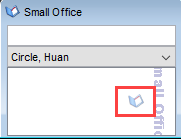
Move a Patient to a Treatment Room
- Click the Traffic button on the Accuro Navigation bar.
Patients in the Waiting Room are displayed in the top of the window and the Treatment Rooms are displayed in the bottom of the window.
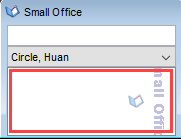
- Click to select the appropriate patient in the waiting room. Holding down the left mouse button drag the patient into the appropriate treatment room.
- Release the mouse button and the patient's appointment details are displayed, click OK to confirm.
The patient's details are now in the selected treatment room.
Note: Drag the patient details into the red-highlighted area of the treatment room, see below, any other area in the treatment room does not move the patient:
Tip: If all of the patients in the Waiting Room cannot be seen on the Waiting Room list in Traffic. Click Scheduler and verify that all patients have been marked as arrived, then go back to Traffic.
Send a Patient Back to the Wait Room
- Click the Traffic button on the Accuro Navigation bar.
- Select the patient in the treatment room being sent back to the Wait Room. Right-click on the patient and select Send to Wait Room from the list displayed.
Note: Another way of moving the patient is click to select the appropriate patient in the treatment room. Holding down the left-hand mouse button drag the patient back into the appropriate waiting room.
View Appointment History
- Click the Traffic button on the Accuro Navigation bar.
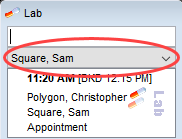
- Right-click on the appropriate patient in the treatment room and select Appointment History from the list displayed. The Quick Patient Appointments View is displayed.
This is a quick view the selected patient's appointment history.
View Tasks Created for this Patient
- Click the Traffic button on the Accuro Navigation bar.
- Right-click on the appropriate patient in the treatment room and select View Tasks from the list displayed. The Patient Tasks window is displayed.
This is a quick view the selected patient's task history.
View a Patient's Virtual Chart
- Click the Traffic button on the Accuro Navigation bar.
- Right-click on the appropriate patient in the treatment room and select Virtual Chart from the list displayed. The Quick Patient Summary window is displayed.
This is a quick view of information on the selected patient.
Go to a Patient's EMR
- Click the Traffic button on the Accuro Navigation bar.
- Right-click on the appropriate patient in the waiting room or treatment room and select Go to EMR from the list displayed. This opens the patient's EMR.
Clear Notifications
If avatars are used for treatment rooms, when a patient is moved from the treatment room back to the waiting room the avatar is displayed next to their details:
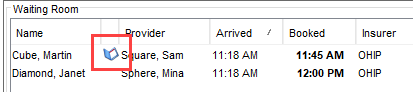
This identifies quickly and easily where a patient has come from. If they are not returning to the treatment room, then the room with that avatar may need attention. If the patient is returning to the treatment room, because of the avatar, it is easy to identify which treatment room they should be returned to.
If you no longer require an avatar to be assigned to a patient:
- Click the Traffic button on the Accuro Navigation bar.
- Right-click on the appropriate patient in the waiting room or treatment room and select Clear Notifications from the list displayed. The avatar is no longer displayed next to the patient.
View Claim Details for Current Appointment
- Click the Traffic button on the Accuro Navigation bar.
- Right-click on the appropriate patient in the waiting room or treatment room and select Claim Details from the list displayed. The claim for the selected patient's current appointment is displayed.
Note: Claim Details can also be viewed by using the right-click option in the Completed Details window.
Complete a Patient's Visit
When a patient's visit has left the treatment room, they need to be marked as completed.
- Click the Traffic button on the Accuro Navigation bar.
- Right-click on the patient in the treatment room and select Completed from the list displayed.
The patient is removed from the treatment room which is now shown as being empty.
Tip: To view all completed visits for the day, click the completed button in the Traffic Manager window.
Validate Health Card Number (ON)
- Click the Traffic button on the Accuro Navigation bar.
- Right-click on the appropriate patient on the waiting room list and select Validate Health Card.
Note: This feature requires the ON Health Card Validation Module enabled.