Billing FAQ
In this section, you will find the frequently asked questions regarding Billing in Accuro.
Accidentally Made New Claims for Days that had Imported Ones
Question: Our clinic has accidentally made new claims on days that had imported ones as we did not think that we could resubmit the imported claims. How do we remove the duplicate claims?
Answer: To remove the duplicate claims, set them to No Charge as described below.
- Right-click on one of the duplicate claims and select Options from the list displayed.
- Click No Charge. This sets the claim to $0.00.
- Repeat these steps for all the duplicate claims.
Accessing GoNet Using Windows Hyper Terminal (ON)
Question: How do I access GoNet using Windows Hyper Terminal?
Answer: Follow the setup procedure below:
Please read the following information about Hyper Terminal before you start this procedure Hyper Terminal for Windows.
- On your computer click the Start button in the bottom-left corner.
- Select Accessories, Communication and Hyper Terminal.

The following window is displayed:
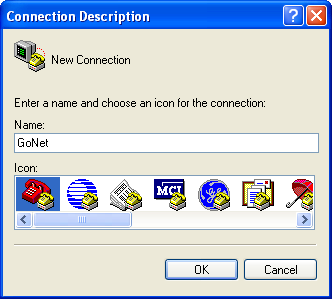
- Click to select an Icon and type in the name GoNet. Click OK. The Connect To window is displayed:
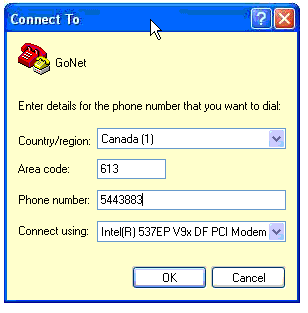
- Click the
 to the right of Country/Region and select Canada (1).
 - Type in your Area code.
- Type in the modem number for the office you submit to.
- Click the to the right of Connect using and select your modem from the list displayed.
- Click OK. The Connect window is displayed:
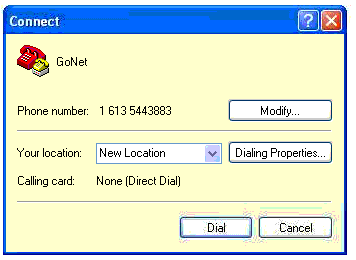
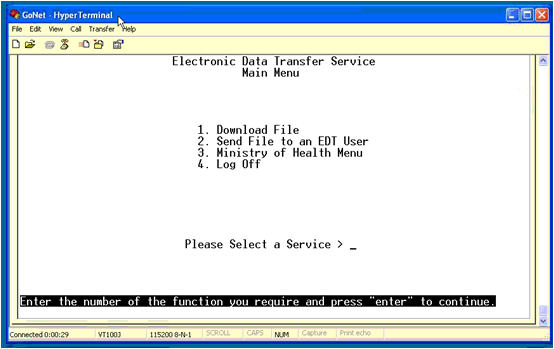
- Click the Dial button. Once the connection to GoNet has been established, the GoNet Hyper terminal is displayed:
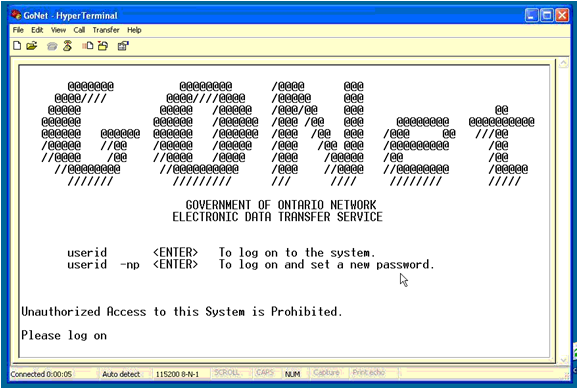
- Type in your MOH number and Password.
Send a Claim Using GoNet (ON)
- Log into GoNet. If you need help setting up GoNet see Accessing GoNet Using Windows Hyper Terminal.
- Select option 3. Ministry of Health Menu but if there is an option to Send File (not shown here) then select that option.
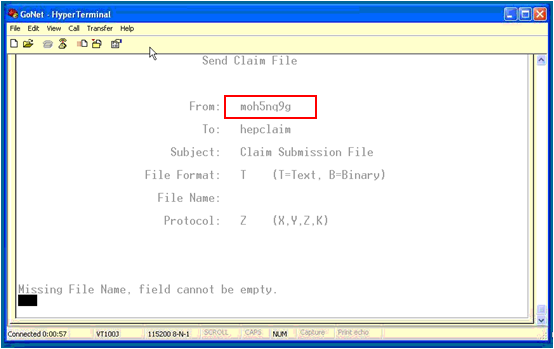
- Type in the MOH Number in the From field. Ensure all other fields are completed (including the file name).
- Click Transfer on the Menu bar and select Send File from the list displayed.
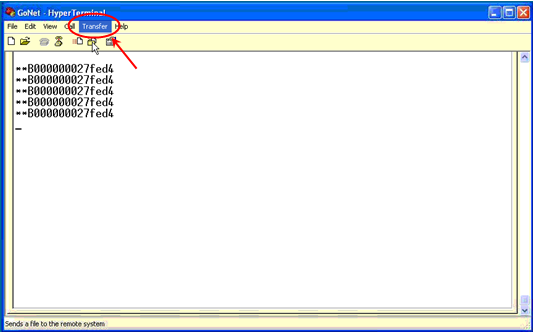
The Send File window is displayed:
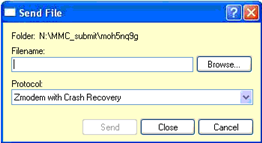
- Browse to the location of the file and select the appropriate file.
- Click Send.
Pick up a Remittance Using GoNet (ON)
- Log into GoNet. If you need help setting up GoNet see Accessing GoNet Using Windows Hyper Terminal.
- Select option 1. Download File. A window with all the files to be downloaded is displayed:
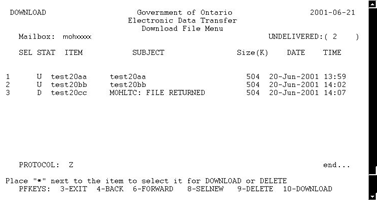
- Place an * beside the files to be downloaded and then press Escape+0 (Escape+Zero) to start the download.
Note: The display says to press F10 to download but this does not work Escape+0 must be used.
Add a Billing Location
Question: How do I add a billing location for a Provider?
Answer: To add a billing location follow the procedure below.
- Press F2.
- Highlight the appropriate Provider in the search results section.
- Click the Configure button. The Provider Wizard is displayed.
- Click Next to move to the Billing details window.
- In the Defaults section select the New Bill Location, as required.
- Click Next until you reach the end of the wizard and then click Finish.
Add a Note to a Claim that has Already Been Submitted
Question: How can I add a note to a claim that has already been submitted?
Answer: It is possible to add a note to a claim that has already been submitted. To do this follow the procedure below:
- Click the Claims icon.
- Click the Daily Claims tab.
- Browse to the day of the claim and double-click the appropriate claim.
- Type in the note, as required.
- Click Save. The claim is updated to include the note you have just typed in.
Add Hospital Master Number
Question: How do I add a Hospital Master Number?
Answer: To add a Hospital Master number press F2 to open the Provider Management window. Select the Provider. Click the Configuration button, click Next until you reach the Billing Options (Step 2). Add the appropriate hospital to the Hospital Codes (Shared by All Providers) field.
Adjusted Claim Still Showing in Unsubmitted
Question: I have a claim that has been adjusted but it is still showing in the system as unsubmitted. How can I submit the claim?
Answer: If the claim has been correctly adjusted and there are no warning messages it may be that the resubmit flag is the problem. To remove the resubmit flag follow the procedure below:
- Click Claims.
- Select the Unsubmitted Claims tab.
- Right-click on the appropriate claim and select Options.
- Select Resubmit. This removes the resubmit flag.
Assign an Out of Province Referring Physician (BC)
Question: How do I assign an out of province referring physician?
Answer: To identify a referring physician as out of province use the billing number 99998 on the claim form.
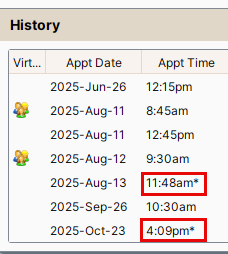
Bill Created by an Appointment v Bill Created by Ctrl+B
Question: The appointment created a bill and I also created a bill using Ctrl+B. I want to delete one, how can I tell the difference between both bills?
Answer: The bill that you created is the one that must be deleted. The one created by the appointment cannot be deleted unless the appointment is deleted first. To see which bill is which look at the history at the bottom of the Claim Details window. The bill listed with an * beside the time was created using Ctrl+B. If there is no * then the bill was created by an appointment. See below for an example:
Billed and Submitted a Claim Twice, Paid Once and Rejected Once
Question: I billed and submitted a claim twice for the same patient, one has been paid and the other has been rejected. How do I write it off? I was told if I use write-off that it will affect my accounting.
Answer: The correct way to deal with the second bill is to use Adjust to Paid option that is available by right-clicking on the appropriate bill.
Billed for a Rural Patient Without Claiming the SSC Location (BC)
Question: I have billed for a home visit to a patient who lives in a rural location. I wasn't aware that the doctor gets paid more money for this visit so I didn't bill accordingly. How to I correct this?
Answer: The easiest way to correct this is to resubmit the claim with an e-debit, once MSP have removed the money they paid for the claim rebill with the correct SSC location.
Billing Code Will Not Let me Bill for Four Units (SK)
Question: I am trying to use a billing code to bill for 4 units and it keeps reverting to 1 unit. Why is this happening?
Answer: This is because the maximum quantity is set to one. To change this:
- Press and release the Alt button on your keyboard.
- Click Billing and select Billing Options and Manage Procedures.
- Select the appropriate Procedure Code.
- Change the Max Quantity field, as required.
- Save your changes.
Billing for Clinic and Hospital Clinic
Question: The doctor works at our clinic and also at a clinic at the hospital. How do I bill the doctor when they are at the hospital clinic?
Answer: Create the claims for your doctor at your clinic in the usual way. When you are billing for the doctor at the hospital clinic change the location to Hospital Outpatient.
Billing for Federal Inmates (BC)
Question: How do I bill for federal inmates?
Answer: To bill for a federal inmate you need to add "000" (three zeros) to the beginning of the PHN. MSP recognizes and PHN beginning with "000" as an inmate.
Billing for Hospital Days for Two Providers
Question: I have to bill hospital days for a patient but the days are split between two providers. How do I do this?
Answer: To bill hospital days between two or more providers:
- Open up a new claim for the patient.
- Select the first Provider and enter the appropriate billing code. The hospital days window is displayed.
- Enter the first and last day for the first Provider.
- Click Save and New.
- In the New Claim displayed, select the second Provider, enter the appropriate billing code, the hospital days window is displayed.
- Enter the first day and last day for the second Provider.
Note: the first day is the day the patient was admitted to hospital. Accuro knows that you already have a claim for hospital days to the first Provider and will deduct these when the number of hospital days are calculated. Repeat this procedure for as many providers as you need to bill for. - Click Save and Close.
Billing for Out of Province Providers (BC)
Question: How do I bill for an out of province Provider, their physician number us longer than the 5 characters allowed?
Answer: Use the number 9998 as the Practitioner ID this shows that the Provider is out of province.
Billing for a Member of the RCMP
Question: How do I submit a claim for someone who is RCMP?
Answer: Complete the Claim Details as usual but change the Province to say "Other". Type the RCMP number into the Health # field in patient demographics.
Billing Hospital Days Across More Than One Month (SK)
Question: How are hospital day claims dealt with when they cross into more than one month.
Answer: When billing a hospital care date with a discharge date in a different month to the admission date and another procedure is included in the claim, the claim number will increase as per MCIB submission rules.
Billing Hospital Days Across More Than One Provider
Question: Can I bill hospital days between more than one Provider.
Answer: Yes, you can bill hospital days between more than one Provider. But only one Provider can submitted a bill for any one day. If two providers submit bills for the same day, the last bill submitted will be rejected saying that the hospital day has already been paid. You can bill for the admission date, all the hospital days and also the discharge date.
Billing Hospital Codes on one Claim (SK)
Question: There is a new billing procedure for 25L. If I bill 9L and 25L on the same claim form will my submission be rejected?
Answer: No, the claim will not be rejected. You can now bill a discharge fee with the rest of a hospital claim.
Billing More Than One Claim for a Patient
Question: How do I bill more than one claim for a patient?
Answer: Open up a new claim (Ctrl+B in the Daily Claims tab in the Claims section) and complete for the patient in the usual manner. When the form is completed click Save and New to open up a new form to create a second claim. Continue using Save and New until you have all the required claims completed for the selected patient.
Billing Practitioner Number Not Configured (ON)
Question: I am getting an error message billing practitioner number not configured. What is causing this?
Answer: This is usually cause when the Pract # on the claim does not match the Doctors Pract. number on the Provider Management screen (press F2 to see this). Check both these numbers and correct whichever number is deemed to be incorrect.
Billing Specialty Codes (MB)
Question: I am unable to bill PCodes under my name e.g. 8403. Why Not?
Answer: This is because some codes are specialty codes and cannot be billed by just any Provider only a Provider with the correct specialty. In this case code 8403 is a procedure code of type C which means it must match a specialty code in the following list:
01
011
012
013
014
015
016
017
018
019
041
042
044
045
046
049
052
12
141
142
15
150
151
152
153
154
155
156
158
159
- To set a specialty press F2 and select the appropriate Provider.
- Click the Provider Demographics tab.
- In the Provider Type field click the and select from the list displayed.
- Type in the Specialty code.
- Click the Update Provider button to save your changes.
Can we Share Favourite Custom Codes?
Question: Can we share favourite custom codes in the same way that we can share favourite prescriptions?
Answer: Unfortunately, custom codes cannot be shared. the only way around this is to create billing macros for the codes you frequently bill and would like to share. Billing macros are shared with everyone.
Cannot See a Patient's Claim in Either the Daily Claims or the Unsubmitted Claims Tab
Question: I cannot see a patient's claim in either the Daily Claims or Unsubmitted Claims tab. But I can see their appointment in the Scheduler. Why is this?
Answer: This is usually because the Provider listed in the claim details is incorrect. To fix this issue open the appointment in Scheduler and select the correct Provider from the list displayed. To do this follow the procedure below:
- Click Scheduler on the Accuro Navigation bar.
- Double-click on the appropriate appointment to open the Appointment Details window.
- In the Provider field (right hand column) click the and select the correct Provider from the list displayed.
- Click OK to save your changes.
Change Bill Default From Inpatient to Office
Question: How do I change the default for a bill from being Inpatient to Office?
Answer: To change the default location follow the procedure below:
- Press F2 the Provider Management window is displayed.
- Click the Configure button. The Provider Wizard is displayed.
- Click the Next button until you get to Billing Details (step 2).
- Click the to the right of New Bill Location and select from the list displayed.
- Click Next to get to the end of the Provider Wizard.
- Click Finish to save your changes.
Change Default From PP to Provincial Health Insurer
Question: How do I change the default insurer from PP to the provincial health care insurer?
Answer: The default insurer is set in the Demographics area of Accuro. To update the insurer information follow the steps below:
- Select the appropriate patient.
- Click the Patients icon on the Accuro Navigation bar.
- Click the Demographics tab.
- Click the to the right of Default Insurer and select the new insurer from the list displayed.
- Click the Update Patient button located at the bottom of the window to save your changes.
Change DOS on a Claim
Question: I have had some mistakes with DOS, when I bring up the claims it won't let me change the DOS. How do I do this?
Answer: The DOS can only be changed if the claim has not been submitted and there is no appointment attached to it. To change a claim created by an appointment you would have to cancel the appointment and then recreate the claim.
Change the Claim's Insurer Without Opening the Claim Details
Question: Is there an easier way to change the claim's insurer without going into claim details?
Answer: Yes it is possible to do this, follow the procedure below:
- Click the Claims button.
- Select Daily Claims or Unsubmitted Claims tab.
- Right-click on the appropriate claim and select Options.
- Select Change Insurer, select the new insurer from the list displayed.
Changing the Provider in the Claim Details Window
Question: When I am in the claim details, I am unable to select the Provider dropdown to change the Provider. Why is this?
Answer: If the claim was created from an appointment then you need to go into the appointment itself to change the Provider. The Provider can only be changed on the claim details window when you are creating a new bill.
Claim Details Window Opens Like a Bar
Question: When I double-click on a patient's name to bring up the daily claim box it only opens the header bar. How do I fix this?
Answer: This is because the last time the claim details window was open it was reduced in size (it remembers the last size it was). Drag the edges of the claim details window to resize as required.
Claims Accidentally Marked as Resubmit
Question: If claims have accidentally been flagged as resubmit, how do I remove the flag from the claims?
Answer: Re-select the appropriate claims and then right-click and select Options and Resubmit. By clicking resubmit again, the resubmit flag is removed.
Claims Are Auto Populating With Codes
Question: My claims are auto populating with P and D codes. Why?
Answer: This is because these will have been set up in the Provider management area of Accuro. To access these:
- Press F2 to go to Provider Management.
- Select the appropriate Provider.
- Click the Configure button.
- Click the Next button until you reach Billing Options (step 2) At the bottom of the window in the Defaults section you will find Diagnostic Code and Procedure Code.
- Clear the Diagnostic and Procedure Code fields to stop the auto populating.
- Click Finish to save your changes.
Claims Created from Appointments, How to Bill in Daily Claims
Question: What is the proper procedure for creating claims?
Answer: Follow the steps below.
- If the claim is the result of an appointment then the claim form will already have been created. The easiest way to see these is to go to the Daily Claims tab in the Claims section of Accuro.
- If the claim is not the result of an appointment then a new claim can be created by pressing Ctrl+B when you are on the Daily Claims tab in Accuro.
- There are two tabs in claims where you can view unsubmitted claims:
- Daily Claims: Displays only the current day's claims.
- Unsubmitted Claims: Displays all unsubmitted claims.
- Claims that are created as a result of an appointment cannot be deleted. If you accidentally create a claim using Ctrl+B and then you realized there is already one created by the appointment, the one you created is the one that has to be deleted.
Claims Submission (ON)
For help on how to do this see EDT Connection (ON).
Codes, Unable to Find a Code When Searching
Question: I am looking for a code and when I search for it I am unable to find it.
Answer: This depends upon the type of code as to where it will be found. Pcodes and dcodes can be found when searching on the claim form. Nature of Injury codes will only be found when you have the WCB form open and you search for a code on the WCB form.
Comprehensive Care Billing Codes (BC)
Question: How do I bill Comprehensive Care codes? I would like to enter 3 codes but I can only get the first one entered.
Answer: To add the three codes you need to be in Daily Claims. Click on the Column Options button  and select all three DCodes.
To be able to enter all three codes you must enter them in Daily Claims and not Claim Details.
Create a Claim When the Patient Doesn't Have an Appointment
Question: How do I create a claim when the patient doesn't have an appointment?
Answer: The easiest way to create a claim is to press Ctrl+B. But you can also use the following ways:
- Click Billing on the Menu bar and select New Bill.
- Click Claims > select the Daily Claims tab > right-click and select New Bill.
Create a PP Bill
Question: How do I create a PP bill?
Answer: If the patient has an appointment, the claim will have been created from the appointment (click Claims > select the Day Sheet tab) other wise on the Day Sheet tab press Ctrl+B. Complete all the codes for the procedures that the patient has had. In the insurer section click the down-arrow and select -PP- or Patient Pays. When you have completed the form, click Save.
Created a Bill in Error, Add Text Explaining Why it Wasn't Submitted
Question: I created a bill in error. How do I add a note to the claim explaining what happened.
Answer: To do this right-click on the bill in Daily Claims or Unsubmitted Claims and select Claim Details. In the Note field add your notes. Click Save and Close to save your changes.
Creating Exceptions For Default Billing Codes
Question: I have default procedure and facility codes set up for my bills. Is it possible to create exceptions to these bills?
Answer: Yes, exceptions can be created in the Provider Wizard. To create an exception follow the procedure below:
- Press F2 the Provider Management window is displayed.
- Click the Configure button. The Provider Wizard is displayed.
- Click the Next button until you get to Billing Details (step 2).
- Scroll down the page to the Facility Exceptions section.
- Type in the Procedure Code you want to create an exception for.
- Type in the Facility Code to be used for the Procedure.
- Click the Add Exception button. Repeat steps 5 to 7 for any more exceptions you want to add.
- Click Next to get to the end of the Provider Wizard.
- Click Finish to save your changes.
Debit a Bill (BC)
Question: How do I debit a bill?
Answer: To debit a bill follow the procedure below.
- Click the Claims icon.
- Select the appropriate claims tab.
- Right-click on the bill to be debited and select Options.
- Select Debit Bill.
Delete an Invoice / Third Party Claim
Question: How do I delete an invoice or third party claim?
Answer: To delete the claim follow the procedure below:
- Click the Claims icon.
- Select the Daily Claims tab.
- Right-click on the appropriate claim and select Delete Procedure.
Delete an Incorrectly Billed Procedure
Question: How do I delete an incorrectly billed procedure?
Answer: To delete an incorrectly billed procedure go to the Daily Claims tab, right-click on the appropriate procedure and select Delete Procedure.
Delete Procedure Created by an Appointment with EMR Notes Attached
Question: I want to delete a procedure but the option to do so is greyed out. The procedure was created from an appointment and has EMR notes attached to the DOS. How do i do this?
Answer: This is not difficult to do but it has to be completed in the order listed below:
- Go to the EMR and change the Date of Service for the EMR note (click EMR > select Encounter Notes tab > change DOS by clicking calendar icon next to DOS dropdown > save note).
- Go to the Scheduler and cancel the appointment (right-click menu option).
- Delete the procedure (right click and select Delete Procedure).
Determine a Claim Number (BC)
Question: How/where can I find a claim number?
Answer: Right-click on the appropriate claim and select Claim History. The claim number is displayed. Please note that this claim number is different to the one that MSP will assign to your claim.
Diagnostic Code Leading Zero
Question: How do I stop the "0" from being at the beginning of a diagnostic code. I am asking because the doctor is a gynaecologist and codes are different to GP codes e.g. code 629 is different from 0629.
Answer: The 0 is default when there is no code in the procedure code field if you tab to get to this field then the 0 is highlighted and overwritten by whatever code is typed in. This means that the 0 will not be at the beginning of the number you type in.
Diagnostic Code Updates
Question: I need some diagnostic codes added how do I do this?
Answer: A diagnostic code update needs to be run from time to time to ensure you have the latest codes. To update DCodes follow the procedure below:
- Click Billing on the Menu bar.
- Select Update.
- Click Update Diagnostic Codes.
If after running the update codes are still not available then they can be added manually:
- Click Billing on the Menu bar.
- Select Billing Options.
- Click Manage Diagnostic Codes.
District Code Number Wrong (ON)
Question: My district codes is showing up as the wrong one, how can I change it?
Answer: To change the district code for a Provider you need to select the correct Office Location. To update the Office Location follow the procedure below.
- Press F2 to display the Provider Management window.
- Click the Configuration button.
- Click Next to get to the Billing options.
- Click the to the right of Office Location and select the correct location from the list displayed.
- Click Next until you reach the end of the wizard.
- Click the Finish button to save your changes.
Difficulty Submitting Claim with ON Healthcare Number and a BC Address
Question: I am having difficulty submitting a claim with an out of province (ON) healthcare number and a BC address. The patient has just moved here and still has ON healthcare. I am getting the error message saying invalid address.
Answer: This is because the patient either has not notified OHIP (ON Healthcare) of their new BC address or they have notified OHIP and the account has not yet been updated. Change the patient's address in Accuro to their old ON address and then resubmit the claim.
Display Claim History on my Billing Screen
Question: The option relating to claim history does not appear on my screen. I didn't miss it as I have never used it, but since the conference I now know that it is available. How do I get this to display?
Answer: Try changing your screen resolution to see if it is displayed. If the screen resolution is less than 768, the hide/show history and panel are not displayed. If you cannot see the hide/show history then your screen must be smaller or it must think it is.
Delete a Practice Claim
Question: The doctor was practicing with the Claims section and accidentally submitted the claim, which was refused. How do I delete this claim?
Answer: Once a claim has been submitted (even in error) it cannot be deleted. The correct way to process this rejected claim is to adjust it to paid by following the procedure below:
- Click the Claims icon.
- Select the All Refusals tab.
- Right click on the appropriate claim and select Adjust to Paid.
Delete Not Reconciled Items
Question: I resubmitted some claims that had been paid, the second claim was rejected saying they have been paid. Can I delete these duplicate claims?
Answer: No, you cannot delete the duplicate claims. The correct way to process these is to adjust them to paid.
- Click the Claims icon.
- Select the Not Reconciled tab.
- Right click on the appropriate claim, select Options and Adjust to Paid.
Do Not Want Appointments to Create Claims
Question: When I book an appointment under a certain Provider I would like Accuro to not create a claim but I am not sure how to do this?
Answer: When a patient has an appointment there is no way to configure Accuro to not create a claim. But no can mark an appointment as No Charge if you do not want to charge.
D59 Rejection Code on WCB Claim, What Does it Mean? (AB)
Question: I have a rejection code of D59 on a WCB claim and would like to know what this is as there is no explanation?
Answer: D59 is the WCB code for "No medical report to Support Payment."
Duplicate Appointment and Duplicate Claim, Deleting One
Question: I have accidentally created duplicate appointments that have created duplicate claims. How to I delete one of the claims and the associated appointment?
Answer: You cannot delete a claim that was created from an appointment. So to remove the claim, you must delete the appointment first. Once the appointment has gone, then you can delete the claim that was associated with the appointment. Follow the steps below:
- Click the Scheduler icon.
- Right click on the appointment you want to remove and select Cancel Appointment.
- A confirmation message is displayed, click Yes.
- Select a reason for cancelling the appointment and click OK. The appointment has been deleted.
- Click the EMR icon.
- Click the Daily Claims tab. If the claim had no information added i.e. no PCodes and DCodes added then it was deleted when the appointment was cancelled.
- If the two identical claims are still being displayed. Right-click on the claim and select Claim Details.
- Look at the Start and End times of the claim. The one that matches the time of the appointment that was NOT cancelled is the one you need to keep.
- Right-click on the claim you want to remove and select Delete Procedure. Delete all the sub-procedures first and then the main procedure. Repeat until all claims associated with the deleted appointment have been removed.
Edit a Claim that has Already Been Submitted
Question: How can I edit a claim that has already been submitted?
Answer: It is possible to edit a claim that has already been submitted. To do this follow the procedure below:
- Click the Claims icon.
- Click the Daily Claims tab.
- Browse to the day of the claim and double-click the appropriate claim.
- Edit the claim, as required.
- Click Save.
EDT Connection (ON)
To access the Electronic Data Transfer (EDT) Connection you must have the following:
- An EDT Username and Password.
- You must be logged into the computer in the office that has been setup for submissions with the EDT software and dial-up modem.
- You will have to click on Submit Claims within Accuro to get a window displaying the submission file.
- Once logged on to the computer/server where the submissions will be done, there is a shortcut on the desktop called EDT Connection. Double-click this icon to open up the connection tool.
- Once opened, you are prompted with the connection information which should be pre-populated with the number and connection information. Click Connect.
After establishing a connection to EDT (this process can take a minute), you are prompted for your username and password for EDT submissions. - Type in your username and press Enter.
- Type in your password and press Enter.
- You are prompted with some additional information regarding your edit account, press Enter to bypass this.
EMR Fee Requested, Turn it on All the Time
Question: Is there a way to have the EMR Fee Requested always selected?
Answer: We cannot turn on the EMR Fee Request on permanently for legal reasons. This fee is only available for documented visits only and not all claims.
Facility Number, How do I Find One?
Question: I need a facility number, where do I find it?
Answer: To find out a specific facility number contact the facility or the provincial government. Accuro does not keep a list of facility numbers.
Hospital Location not Showing for all Subprocedures in a Claim
Question: When I bill for an emergency department location my claim has multiple lines. The hospital location needs to be applied to all subprocedures added and it isn't. How do I fix this?
Answer: This is an issue with the workflow when creating the claim. The following workflow should be followed and then the hospital location is applied to all subprocedures.
- Open up a new claim.
- Change the location to the appropriate hospital or treatment centre.
- Add the subprocedures
Hospital Numbers Not Showing Up?
Question: Facility numbers are not showing up in my billing and I think that they should be?
Answer: These codes are automatically sent when the Provider sends a bill with the appropriate hospital selected.
How are Hospital Start Dates Calculated?
Question: How are hospital start dates calculated?
Answer:
- A hospital start date is a calculated field based on DOS and the first Hospital Code that is in the claim (should only be one hospital code).
- The hospital start date field is only enabled when the current bill selected contains a hospital code.
- If the user changes the hospital start date, the current bill quantity changes to reflect the INCLUSIVE day difference between Hospital Start Date and DOS.
- If the user changes the quantity of a hospital code bill then the hospital start date updates to reflect the new start date.
- If you change the DOS when a claim has a hospital bill in it the user is asked if they want to update the Qty of the hospital code OR update the date of service to match (DOS - Qty). The user can check "Always do this" which saves as a user preference and can be set back to default in the "File\User Preferences" then display tab.
How do I do Hospital Billing in SK
Note: For SK hospital billing you can bill multiple days for the hospital stay. But, you must bill a separate claim for the admission and also a separate claim for the discharge.
- Click the Claims button
 on the Accuro Navigation bar.
 - Click the Daily Claims tab.
- Right-click and select New Bill. The Claim Details window is displayed.
- Type in the patient's last name and select from the list displayed.
- Type in 25B into the procedure code line.
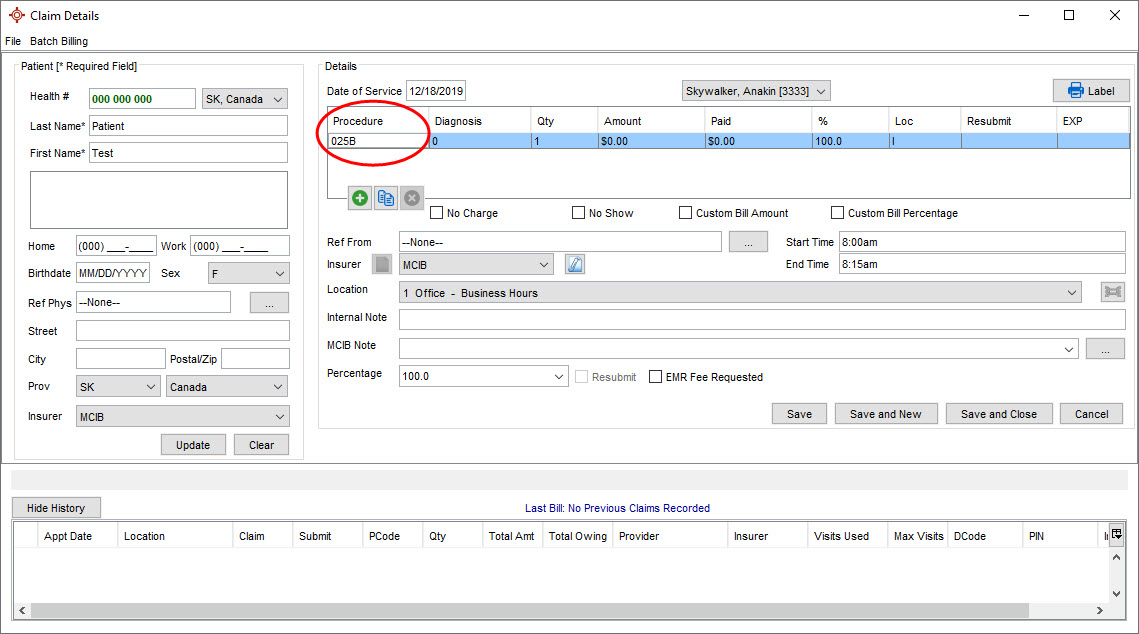
Press the Tab button on your keyboard and the Hospital Care Dates window is displayed.
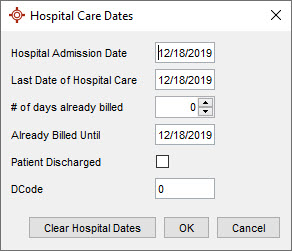
- Type in the dates as appropriate.
Note: If the patient sees more than one doctor, only the last doctor to see the patient click the Patient Discharged checkbox. This automatically creates the discharge procedure code on the claim. - Click OK to confirm the dates.
- In the main Claim Details window, type in the diagnostic Codes as appropriate.
- Save the claim form when completed.
How do I Write Off a Private Payment?
I have an old PP that is unlikely to be paid now, how do I write it off?
To write off a PP, follow the procedure below:
- Click the Claims button on the Accuro Navigation bar.
- Click the Daily Claims tab.
- Select the appropriate date of the PP from the calendar.
- Right-click on the appropriate claim and select Options from the list displayed.
- Select Write Off. The claim has now been written off.
Note: In the event that a patient does eventually pay, follow this procedure again; it will remove the Write Off status from the claim.
How Much Time has a Doctor Booked to a Specific Fee Code
Question: How can I find out how much time Dr Smith has booked to complex care since covering for Dr Jones?
Answer: The easiest way to obtain this information is to run the report Total Billed by Fee/Service Code. Reports can be opened from anywhere in Accuro by pressing Ctrl+R.
Invalid ICD Code (SK)
Question: I was given an ICD Code to use with two procedures. This is a valid code that was release a month ago, but it is coming up, "Invalid ICD Code."
Answer: If the ICD code is a recent one and it is definitely valid, your ICD codes are probably out od date. Update your ICD Codes by following the procedure below:
- Click Tools on the Menu bar.
- Select Updates.
- Click Update ICD Codes.
Invoices are Displaying Incorrect Tax Options
If PP invoices are displaying incorrect tax options for your province, this option needs changing. To do this:
- Click Billing on the Menu bar and select Options from the list displayed.
- Click Manage Procedures from the list displayed.
Type 0 (zero) in the Procedure field and press the Tab key on the keyboard. The taxes and their status are displayed.
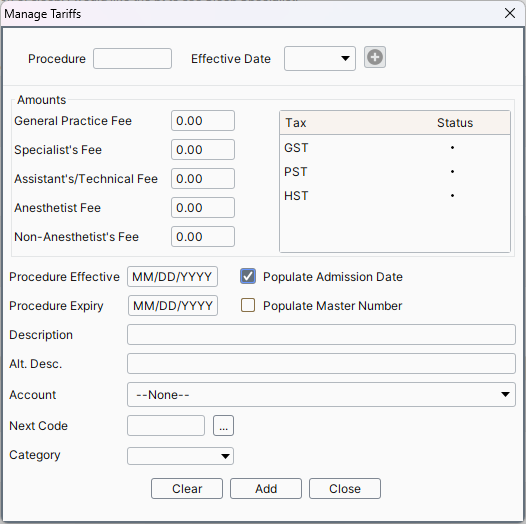
- Click to select or deselect the taxes, as appropriate.
- Click the Update button to save your changes.
Invoices, Default
Question: I have created an invoice to be used for WCB claims. However my WCB claims are not using it and I don't understand why?
Answer: Each Provider can have one invoice as default. There is no way to switch backwards and forwards between more than one invoice. You can make the WCB invoice the default for this Provider but that means it would be used on all claims and not just WCB ones.
Macro Overwrites Billing Codes
Question: When I apply a macro to a claim it overwrites the macro and other billing codes I had already added. What is wrong?
Answer: You can only add one macro to a claim. The macro will remove all codes already contained in the claim and replace them with the codes contained int the macro. If you want to add other codes to the claim, the macro must be added first and then other codes may be added to the claim.
Note: This only applies to claims that have not yet been submitted.
Manually Adding MSP PCodes (BC)
Question: I would like help with adding a new PCode for MSP claims. I have created one but I cannot validate the claim.
Answer: Do not manually add PCodes, run the Fee code update instead. Manually added PCodes will not validate unless MSP has advised you that it is OK to add the code manually. If a manually added fee code will not validate then this is saying that MSP are not recognizing the manually added PCode.
No Longer Prompted for Certificate SK
Question: I used to be prompted to OK the certificate when I submit billing when I do the first submission after logging in. This no longer happens, is something wrong?
Answer: After you submit, check your validation reports. If these say that the submission was successful then there is not a problem. Some antivirus programs are known to still allow the certificate but you will no longer be prompted to OK the certificate.
No Show Reversal
Question: A patient had a bill on a Day Sheet that was marked as No Show. I found out a few days later that she did actually attend the appointment. How do i fix the bill?
Answer: The correct way to process this bill is to select No Show again and this will reverse the action. to do this follow the procedure below.
- Click the Claims icon.
- Click the Daily Claims tab.
- Change the date to the date of the appointment.
- Right-click on the appropriate bill and select Options.
- Select No Show, this will remove the No Show flag.
Not on File Claims, Write Off
Question: How do I write off Not on File claims?
Answer: In not on file claims there is no option to do anything to the claims. The reason for this is that the claims are not part of Accuro so they will not affect your accounts receivable. However, if you were needing to resubmit a claim you can create a new claim in Accuro and send it to MSP.
PP Accidentally Billed Twice
Question: I accidentally billed a patient twice. How can I correct this?
Answer: If you accidentally bill a PP twice, this is how to correct the billing.
- Select the appropriate patient.
- Click the Patients button
 on the Accuro Navigation bar.
 - Click the Private Billing tab. On this tab you can see where the patient was billed twice.
- Click to select the amount incorrectly billed.
- In the Record Payment section type in the amount the patient has been incorrectly billed.
- Click the to the right of Type and select Refund (Correction) from the list displayed.
- Click the Pay button. The incorrectly billed amount is still displayed but a correction is displayed beneath it.
PP Claims Making Sure They do not Get Submitted
Question: I am completing some PP claims they are showing as care card required in my Daily Claims. How do I stop them from being submitted?
Answer: All claims regardless of the insurer are displayed in the Daily Claims tab. If the insurer is set to PP then they will not be submitted. The easiest way to check this is to click the Unsubmitted tab and you will see that your PP claims are not listed.
Print a Remittance Summary
Question: How do I print of a remittance summary?
Answer: To print out a remittance summary follow the procedure below:
- Press Ctrl+R to access the Reports.
- Select the Remittance Summary report in the Billing section.
- Complete the information as required and click the Generate Report in the bottom-right corner of the window.
Print Cumulative Preventative Care Bonus Information (ON)
Question: How do I print the Accumulative care Bonus?
Answer: Follow the procedure below:
- Click Billing on the Menu bar.
- Select Cumulative Preventative Care Bonus.
- Select the options you are interested and and click Run.
- To print the results click the Print button.
Provider Default Start Time
Question: I have an issue with billing. I set all my bills with a start time of 8:00AM and they have all changed to 12:00AM. What is happening?
Answer: This is because the Default Provider Start Time is overriding the time in your bill. To change the Default Provider Start Time follow the procedure below:
- Press F2 to display Provider Management and select the appropriate Provider.
- Click the Configure button.
- Click the Next button to get to the Billing Details.
- Change the time in the New Bill Start Time field.
- Click Next until you reach the end of the Provider Wizard.
- Click Finish to save your changes.
Remittance Files (ON)
Question: Where are remittance files stored on the computer?
Answer: The pathname to your remittances is usually C:/ONCLAIMS.
Remove a Credit From a Private Insurer
Question: I am trying to correct a bill that was submitted to the incorrect insurer. The original bill was for $500, but I have accidentally got the total to $4000 whilst trying to fix it. How do I correct this error and delete the bill?
Answer:
The first thing to do is to correct the $4000:
- With the correct patient selected click the Patients icon.
- Click the Private Billing tab.
- Click the Manage Accounts button at the bottom-left of the window.
- Click the Add Credit (just below and to the left of the Amount field).
- Type $4000.00 into the Amount field and press Apply. This clears the $4000.
Next you need to delete the claim:
- Click the Claims icon.
- Select the Daily Claims tab.
- Select appropriate date and claim.
- Right-click and select Delete Procedure.
Removing Procedure Codes No Longer in Use?
Question: Can I remove a procedure code that is no longer in use?
Answer: Procedure codes cannot be removed manually by a clinic. To remove codes send a signed fax to Accuro listing the codes to be removed and our Development team will be happy to remove them for you. The Accuro fax number is 1.866.421.9332.
Resubmit a Claim
Question: I have a claim that was rejected. I have corrected the claim, how do I resubmit?
Answer: To get a claim ready for resubmission double-click to open the claim. Click to select the Resubmit checkbox. Click Save and Close.
Resubmit Claims with the Status of Imported
Question: How do i resubmit claims that have been imported from another system?
Answer: Checking off Resubmit will allow the claims to be submitted and any imported claims will then have a submitted date. To resubmit a claim, follow this procedure:
- Right-click on the appropriate claim and select Options from the list displayed.
- Click Resubmit.
Note: To select a full all claims you can press Ctrl+A.
In Claim Details (right-click on the appropriate claim and select Claim Details) you can see that resubmit is checked off.
Send in a New Claim With the Old Claim Number Attached (AB)
Question: How do I send in a new claim with an old claim number attached to it?
Answer: To do this follow the procedure below:
- Click EMR and select the Daily Claims tab.
- Right-click on the appropriate bill and select Options.
- Select Keep Claim Number. The Claim Number window is displayed.
- Click the and select the old claim number you want to use.
- Click OK.
Service Code Account Payments Report and Total Billed by Fee/Service Code Reports What is the Difference?
Question: When I run the Service Code Account Payments report and the Total Billed by Fee/Service Code report for the same group and time period, I get two different amounts. Why?
Answer:
The Service Code Account Payments Report generates a report based on bills that have payments applied to them in a given date range.
The Total Billed by Fee/Service Code calculates the total amount of the bills for claims that have a date within the given range.
The biggest difference is payments and payment dates versus bills and claim date.
Submission Response Retrieval (ON)
After a submission, approximately 15 minutes during a business day, a response is placed ready to download advising that the last submission was received.
Approximately 48 hours after submission, rejections will be placed ready for download as a claims error report.
On the first few days of each month a file will be ready for download called claims remittance advice, which shows all the payments which will be paid out to the physician.
To download any of these items once logged in to the EDT system do the following from the main screen:
- Select 1 and press Enter.
- Using the arrow keys place an * beside any items that need to be downloaded.
- Once all items that need to be downloaded have been selected, press Esc+0 (Escape+Zero) this starts the transfer process.
- This prompts for a file receiving process, click Transfer on the Menu bar and select Receive from the list displayed.
- Click the Browse button to select where the files will be saved (this should be C:\ONCLAIMS\)
- This populates the file information in to the receive window, click Receive.
- Repeat this process for each file you need to receive.
If you require any further information on this process it can be discussed with a Accuro Client Services Representative by calling the toll free support line during regular business hours at 1-866-729-8889 Monday thru Friday 7:00am – 5:00pm PST.
Another option for this is in Accuro under Help on the Menu bat there is an option Send Feedback. This sends an email to Client Services requesting a call back.
Submit Claims Without Including Current Day
If your clinic submits claims in the morning and you do not want any current day claims to be included (because in some cases the Provider may not have seen the patient yet). This is how to stop current day claims from being submitted.
- Click the Claims button on the Accuro Navigation bar.
- Click the Unsubmitted Claims tab.
- Click the Column Display Option button .
- Click the tick to the left of Include Today to deselect displaying today's claims.
Accuro only submits claims that are displayed, therefore once the current day claims are no longer displayed, they are not included in any submission. Claims for the current day can still be viewed on the Daily Claims tab.
Submitting Bills, How Not to Include Bills For Later The Same Day
Question: When i did my submissions for today patients that have been booked for later in the day have also been submitted. How do I stop this happening in case either the patient does not get seen or the doctor needs to edit one of the claims?
Answer: The easiest way to prevent your clinic from having any issues is to configure the Unsubmitted Claims tab so that it does not include any claims with the current day's date. These can still be viewed on the Daily Claims tab. This would mean that when you clicked to submit on the Unsubmitted Claims tab any claims created today would not be submitted as only claims that are displayed get submitted. To configure the Unsubmitted Claims tab to do this follow the procedure below:
- Click Claims on the Accuro Navigation bar.
- Select the Unsubmitted Claims tab.
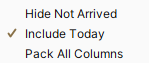
- Click the Column Header button in the top right-hand corner.
- Click the Include Today at the bottom of the list. This makes the tick disappear and today's claims are not displayed on the Unsubmitted Claims tab.
Note: You can also select to only display patients that have been marked "Arrived" by selecting Hide Not Arrived if your clinic wants to submit the claims from the earlier part of the day, but not the later appointments that have not yet occurred.
Surgical Assist Calculator / Surcharge Calculator Billing Units
Question: When I bill for surgical assists e.g. 2 units, I enter the PCodes. Do I then select a quantity of 2?
Answer: Yes, when you are entering the number of units the quantity is the number of units you are entering.
Note: If you are based in AB or MB then by entering the time range Accuro will calculate the number of units for you.
Surgical Assist Billing, Maximum Units (ON)
Question: If I want to bill surgical assist for 11 hours how do I do this?
Answer: The maximum units of surgical assist that can be billed are 99. This is because OHIP only allows for two digits. Unfortunately there is nothing that Accuro can do to change this limitation.
Unable to Delete Main Procedure
Question: I have three procedures not created by an appointment, I want to delete them all but I can only delete one of them what am I doing wrong?
Answer: The first procedure could be deleted because it was a sub-procedure. The second procedure you were trying to delete was the main procedure. All sub-procedures must be deleted first before the main procedure can be deleted.
Updating GO Secure Password (ON)
Question: How do I update my GO Secure password in Accuro?
Answer:
- Press and release the Alt key, click File and select User Preferences from the list displayed. The User Preferences window is displayed.
- Select Logins, select Ontario EBS- IDP and click
 .
. - Enter in new password and confirm.
- Click
 and then
  .
.
WCB Claim Form, Not Enough Space for Clinical Information (BC)
Question: We are trying to complete a WCB Claim Form but the space where you put the clinical information does not have enough room to put all the information. How can I fit everything in this section?
Answer: The size of this section on the claim form is dictated by the WCB and has nothing to do with Accuro. There is a limit of 800 characters and the WCB will not allow any more. If the clinical notes cannot be condensed to less than 800 characters, select the dropdown list for Further Correspondence to Follow. This notifies the WCB that there is more information to follow. A second electronic form can be completed or paper notes can be submitted (faxed or mailed) to WCB.
WCB Paid by Cheque how do I Pay the Claim
Question: The WCB paid a claim by cheque. How do I pay this claim in Accuro?
Answer: To apply a cheque to an Insurer, follow the procedure below:
- Select the appropriate patient.
- Prelease the Alt button, click Reports on the Menu bar and select Insurer Payments from the list displayed.
- Click the and select the Insurer from the list displayed, in this case WCB.
- Click to select the claim which has been paid by cheque.
- Click the Manage Accounts button at the bottom-left of the window.
- If no insurer accounts are listed, click the Add button
 and select WCB from the list displayed.
 - Click OK to add to the Insurer Accounts list.
- Click to select WCB from the Insurer Accounts list.
- Click the and select Add Credit from the list displayed.
- Type in the amount and any note as applicable.
- Click Apply and Close. This amount has now been applied.
WSIB Codes (ON)
Question: There are no WSIB codes linked in Accuro, we are having to link them manually. Is there any plan to have these automatically added into Accuro?
Answer: No, the WSIB does not provide Accuro with a list that we are able to load into Accuro. Until this changes, all codes will need to be entered manually. To enter the codes manually follow the procedure below:
- Click Billing on the Menu bar.
- Select Options.
- Click Manage Procedures.
- Type in the WSIB and linking information as required, click Add to save your changes.
8403 Code in MB
Question: I am trying to use the code 8403 and I get the warning invalid code. Why am I unable to use this code?
Answer: In order to be able to use the billing code 8403, a specialty must be set for the Provider. Once the specialty has been set, the code is available for use. Any bills created before the Provider was set need to have the specialty set manually and then the code 8403 can be used.