Virtual Chart Reminder
- Preview an Item in the Virtual Chart or Open item in Virtual Chart.
- Click the Reminder button.
- Click in to the To section and select staff members to whom you want to receive the message.
- If the reminder is to be attached to the patient's chart, select the Attach to Patient's Chart checkbox.
- Click the dropdown list
 and select the Priority from the list displayed.
- Type in the message in the Body area of the window.
- Click Send to send the message and close the window.
Print an Item in the Virtual Chart
- Click the EMR button
 on the Accuro Navigation bar.
- Select the Virtual Chart tab.
- Right-click on the appropriate item (or use Ctrl+click or Shift+click to select multiple items) and select Print from the list displayed.
- Select the appropriate printer and click OK.
Print Entire Chart / Print Chart
- Click the EMR button on the Accuro Navigation bar.
- Select the Virtual Chart tab.
- Right-click on the appropriate item and select Print Entire Chart from the list displayed.
- Click to select the checkboxes for included items.
- To preview the entire chart click the Preview button. Click Close when finished previewing.
- Click the Print button.
- Select the appropriate printer and click OK.
Note: Patient Alerts and Special Needs are included as part of the entire chart print.
Editing Documents in the Virtual Chart
Documents can be edited in the virtual chart, this is a feature permission and the default is on. If clinics do not want the editing of documents then this feature can be disabled. When a user edits a document the edit document window is displayed. Pages can be deleted or rotated by 0, 90, 180 or 270 degrees.
Note: Selecting Rotate 0 Degrees returns an image to the orientation it was when last saved. Rotate 0 Degrees returns a PDF to the orientation it was when it was first created (even if the document was rotated outside of Accuro).
Only items listed in the Documents section on the left-hand side of the virtual chart can be edited.
Fax an Item from the Virtual Chart
- Click the EMR button on the Accuro Navigation bar.
- Select the Virtual Chart tab.
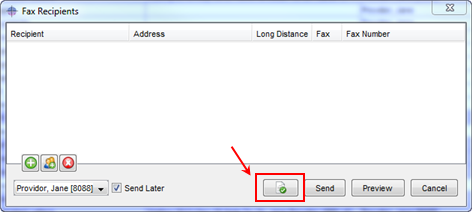
- Right-click on the appropriate item and select Fax from the list displayed. The Fax Recipients window is displayed.
- Click the Add button
 and select the appropriate fax details from the address book displayed.
- Click the Select button. Repeat for any other recipients, as required.
- Click Preview to see how the data in the fax is displayed.
- Click Send to fax the item.
Note: When faxing if the long distance checkbox is selected Accuro prompts to save the long distance setting in the Address Book.
Faxing Selected Pages
- Click the EMR button on the Accuro Navigation bar.
- Select the Virtual Chart tab.
- Right-click on the appropriate item and select Fax from the list displayed. The Fax Recipients window is displayed.
- Click the Page Selection button
 .
.
Note: The fax cover page is not included in the page selection window or in the page range when filtering.
- By default all pages are selected and displayed in the left-hand column. Drag and drop pages that are not being faxed into the right-hand column (Removed Pages).
Note: Alternatively the page numbers can be typed into the Page Selection field at the bottom of the window.
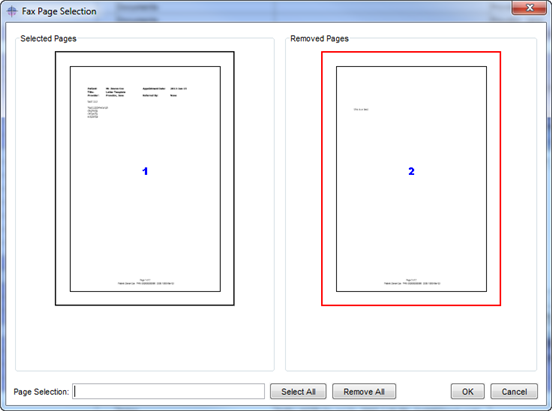
- Click OK to save.
- Click Preview to view the fax.
Note: Preview only displays the pages that were selected when filtering the document.
View Review History in Virtual Chart
- Click the EMR button on the Accuro Navigation bar.
- Select the Virtual Chart tab.
- Right-click and select View Review History from the list displayed.
View Lab Graphs in the Virtual Chart
- Click the EMR button on the Accuro Navigation bar.
- Select the Virtual Chart tab.
- Right-click on the appropriate lab item and select View Lab Graphs from the list displayed. The Lab Results Graphing window is displayed.
- Use the dropdown list to filter by Diagnosis and Lab Tests.
- Use the checkboxes to show Ref Range, Meds, Appts and Show Points, if required.
- Click the Print Graph button
 .
.
- Select the appropriate printer and click OK.
Compare Text Lab Reports
Users can compare two text lab report (text lab reports are those stored in the documents section of the virtual chart). The text lab reports can be compared in the documents section of the virtual chart or in the Labs area of the Home section. When comparing the lab reports are displayed side by side in the window allowing a physician reviewing the new lab to easily compare with older results.
To compare two lab reports from within the Home section follow the procedure below:
- Select the Home button
 on the Accuro Navigation bar.
- Open the Labs folder.
- Select and open the appropriate lab.
- Click the Documents button.
- Select the categories to be compared.
To compare labs in the Virtual Chart follow the procedure below:
- Select the EMR button on the Accuro Navigation bar.
- Click the Virtual Chart tab.
- Open the Documents folder.
- Select and open the appropriate lab.
- Click the Documents button.
- Select the categories to be compared.
Note: Labs can only be compared if they show up as labs in the Documents area of the Virtual Chart.
Print/Fax Summary
- Click the EMR button on the Accuro Navigation bar.
- Select the Virtual Chart or Medications tab.
- Right-click on an active medication and select Print/Fax Summary from the list displayed. The Fax Log window is displayed. A summary of activity on the current selected patient is displayed.
- Click Close when finished.
Send Message in Virtual Chart
- Click the EMR button on the Accuro Navigation bar.
- Select the Virtual Chart tab.
- Right-click on the appropriate Virtual Chart entry and select Send Message from the list displayed.
- Select the user(s) to receive the message by clicking on them under the To: list. To select more than one user, hold CTRL on the keyboard while selecting users.
- If the note is regarding a patient and the patient is not already loaded, make sure the checkbox beside Patient: is checked and load the patient using the Search Tool. Select the Attach to Patient Chart checkbox to attach the message to the patient's Virtual Chart.
- Type in a Subject.
- Select a Priority from the dropdown list.
- Type the message in the Body text area.
- The item you selected is already an Attachment on the New Review Message.
- Click Send.
Send Task in Virtual Chart
- Click the EMR button on the Accuro Navigation bar.
- Select the Virtual Chart tab.
- Right-click on the appropriate Virtual Chart entry and select Send Task from the list displayed.
- Select the user(s) to assign the task to by clicking on them under the "Assign Task To:" list. To select more than one user, hold CTRL on the keyboard while selecting users.
- Select a Task Description from the dropdown list.
- Select a Priority from the dropdown list.
- Select a Due Date. You can do this one of two ways:
• Select how many days, weeks, months, or years from the dropdown list.
• Click on the date and select a new date from the popup mini calendar.
- Enter a Note into the text box.
- The selected Virtual Chart entry is an attachment to this task.
- Click OK.
Configure Views in Virtual Chart
Configure Views is the area of the Virtual Chart when you can control the way that some of the items on the virtual chart are displayed.
Details View
Details view is the default view in Virtual Chart. If the view has been altered to something else, to get back to the Details View:
- Click the EMR button on the Accuro Navigation bar.
- Select the Virtual Chart tab.
- Click the Configure Views button
 and select Details View from the list displayed.