Press and release Alt button on the keyboard or click the Accuro Start Menu Button , click Billing and select Claim View from the list displayed.
Click to select from Standard or Classic, as required.
Classic View includes the tabs Refused Claims and Adjusted Claims. There is no option for date filters in the Adjusted Remittances tab.
Standard View includes tabs Unmatched Remittances. There is a date filter option in the Adjusted Remittances tab.
Default Billing Percent
Change the default billing percent that sub-procedures are billed at.
Press and release Alt button on the keyboard or click the Accuro Start Menu Button , click Billing and select Default Billing Percent from the list displayed.
Click to select from the available options.
Note: The default is 100%.
Billing Rules
Create, edit, and remove Billing Rules.
Add a Billing Rule
Press and release Alt button on the keyboard or click the Accuro Start Menu Button , click Billing and select Billing Rules from the list displayed. The Billing Rules window is displayed.
Click the Add button . The Billing Rule window is displayed.
Click the dropdown list and select the type of rule from the list displayed and click OK.
Complete the Edit Billing Rule window, as required. The options displayed here are dependent upon the type of rule selected.
To save your changes, click OK.
Edit a Billing Rule
Press and release Alt button on the keyboard or click the Accuro Start Menu Button , click Billing and select Billing Rules from the list displayed. The Billing Rules window is displayed.
Click to select the rule being edited and click the Edit button .
Edit the Billing Rule window as required. The options displayed here are dependent upon the type of rule selected.
To save your changes, click OK.
Remove a Billing Rule
Press and release Alt button on the keyboard or click the Accuro Start Menu Button , click Billing and select Billing Rules from the list displayed. The Billing Rules window is displayed.
Click to select the rule to be deleted and click the Remove button .
A confirmation message is displayed, click Yes to remove.
Click OK to close the Billing Rules window.
Maximize Bills
Maximize Bills is a feature in Accuro that when selected, rearranges the billing codes order within a Claim to ensure your office is paid the maximum amount possible for a Claim.
Press and release Alt button on the keyboard or click the Accuro Start Menu Button , click Billing and select Maximize Bills from the list displayed.
Note: If there is a tick beside Maximize Bills in Accuro Start Menu, it is already enabled.
MSP Notes
View and print messages sent from MSP.
Press and release Alt button on the keyboard or click the Accuro Start Menu Button , click Billing and select MSP Notes from the list displayed.
Click and select the messages to be printed.
Click File and select Print Selected or Print All, to print out the required messages.
Click Done when finished viewing the messages.
New Bill
Open a blank Claim Details form to create a new bill.
Press and release Alt button on the keyboard or click the Accuro Start Menu Button , select Billing and select New Bill from the list displayed. Note: Alternatively click the Claims Button on the Navigation bar, select the Daily Claims tab, right-click the appropriate Claim, and select New Bill from the list displayed.
A blank Claims Details form is displayed. Complete the form as required.
New Procedure
Add a sub-procedure to a selected bill - a bill must be selected from the Claims Section to allow a new procedure to be added.
Press and release Alt button on the keyboard or click the Accuro Start Menu Button , select Billing and select New Procedure from the list displayed. Note: Alternatively click the Claims Button on the Navigation bar, select the Daily Claims tab, right-click the appropriate claim, and select New Procedure from the list displayed.
A new sub-procedure form is displayed.
Calculator
Open the calculator feature.
Note: The shortcut to display the calculator isCtrl + Alt + C.
When custom Diagnostic Codes are added as outlined below, the code is being added for use in the EMR/Encounter Notes Section. These Diagnostic Codes added cannot be used for billing purposes.
Search for a Diagnostic Code
Press and release Alt button on the keyboard or click the Accuro Start Menu Button , click Billing and select Billing Options from the list displayed.
Click Manage Diagnostic Codes. The Diagnostic Search window is displayed.
Type in the ICD9 Code or Description and click the Search button.
Select OK to close the Diagnostic Search window.
Add a Diagnostic Code
Press and release Alt button on the keyboard or click the Accuro Start Menu Button , click Billing and select Billing Options from the list displayed.
Click Manage Diagnostic Codes. The Diagnostic Search window is displayed.
Click the Add button . The Add Custom Diagnostic window is displayed.
Type in the Custom Code as required. Add any additional information in the Description field and use the Chronic Condition dropdown, if required.
Click OK to save and close the Add Custom Diagnostic window.
Edit a Diagnostic Code
Press and release Alt button on the keyboard or click the Accuro Start Menu Button , click Billing and select Billing Options from the list displayed.
Click Manage Diagnostic Codes.
Type in the ICD9 Code and click the Search button.
Click to select the appropriate Diagnostic Code and click the Edit button .
Edit the Description for the Diagnostic Code and use the Chronic Condition dropdown as required.
Select OK to save and close the Edit Diagnostic Code window.
Mark a Diagnostic Code as Inactive
Press and release Alt button on the keyboard or click the Accuro Start Menu Button , click Billing and select Billing Options from the list displayed.
Click Manage Diagnostic Codes.
Type in the Custom Code and click the Search button. Note: Only custom added Diagnostic Codes can be marked as inactive.
Click to select the appropriate Diagnostic Code and click the Edit button .
Uncheck the checkbox beside Active.
Select OK to save and close the Edit Diagnostic Code window.
Remove a Diagnostic Code
Press and release Alt button on the keyboard or click the Accuro Start Menu Button , click Billing and select Billing Options from the list displayed.
Press and release Alt button on the keyboard or click the Accuro Start Menu Button , click Billing and select Billing Options from the list displayed.
Click Manage Procedure Codes. The Manage Procedures window is displayed.
Type in the appropriate code and press Enter on the keyboard.
Edit the Procedure Code as required.
Click Update to save the changes.
Change Taxes Applied to PP Invoices
Press and release Alt button on the keyboard or click the Accuro Start Menu Button , click Billing and select Billing Options from the list displayed.
Click Manage Procedures from the list displayed.
Type 0 (zero) in the Procedure field and press the Tab key on the keyboard. The taxes and their status are displayed.
Click to select or deselect the taxes, as appropriate.
Click the Update button to save your changes.
Manage Procedure Code Categories
Create, edit, and remove Procedure Code Categories.
Add a Procedure Code Category
Press and release Alt button on the keyboard or click the Accuro Start Menu Button , click Billing and select Billing Options from the list displayed.
Click Manage Procedure Code Categories and then Manage under Category Name. The Edit Procedure Code Categories window is displayed.
Click the Add button .
Type in the name of the Procedure Code Category and click OK.
In the Search field of the Available Codes section, search for the appropriate Code for the category.
Click the desired Code and select the Arrow button to move it into the Category.
Repeat step 5 and 6 for all desired Codes.
Click Save to add the Procedure Code Category and OK to close the Manage Procedure Code Categories window.
Edit a Procedure Code Category
Press and release Alt button on the keyboard or click the Accuro Start Menu Button , click Billing and select Billing Options from the list displayed.
Click Manage Procedure Code Categories and then the under Category Name, select the desired Category.
To add or remove Codes from the Category, click the code from either the Codes in this Category or Available Codes sections and click the left or right Arrow buttons to move the Codes.
To edit the name of the Procedure Code Category, under Category Name, select Manage. The Edit Procedure Code Categories window is displayed.
Click to select the appropriate Procedure Code Category and click the Edit button .
Type in the desired name, click OK to save and then Close.
Once all changes are made, click Save and OK to close the Manage Procedure Code Categories window.
Remove a Procedure Code Category
Press and release Alt button on the keyboard or click the Accuro Start Menu Button , click Billing and select Billing Options from the list displayed.
Click Manage Procedure Code Categories and then Manage under Category Name. The Edit Procedure Code Categories window is displayed.
Click to select the appropriate Procedure Code Category and click the Remove button .Click Yes in the confirmation window. The selected Procedure Code Category has been removed.
Click Close and OK to close the Manage Procedure Code Categories window.
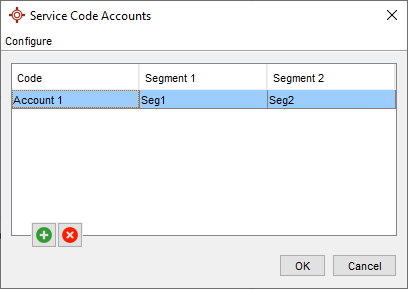
Manage Service Code Accounts
Create, edit, and remove Service Code Accounts.
Service Code Accounts are used for Service Code Account Payments Report. The report lists a summary of Paid amounts for the configured Procedures of the selected Service Code Accounts.
Add a Service Code Account
Press and release Alt button on the keyboard or click the Accuro Start Menu Button , click Billing and select Billing Options from the list displayed.
Click Service Code Accounts. The Service Code Accounts window is displayed.
Click the Add button .
In the text box displayed, type in the Service Code Account.
Click OK to save.
Add Service Code Account Segments
Press and release Alt button on the keyboard or click the Accuro Start Menu Button , click Billing and select Billing Options from the list displayed.
Click Service Code Accounts. The Service Code Accounts window is displayed.
Click Configure and select Account Segments. The Service Code Account Segments window is displayed.
Click the Add button .
In the displayed text box, type in the Segment Name and click OK to save.
In the Service Code Accounts window under the Segment name, type in the Segment Name for the selected Code and click OK to save.
Click OK to save and close.
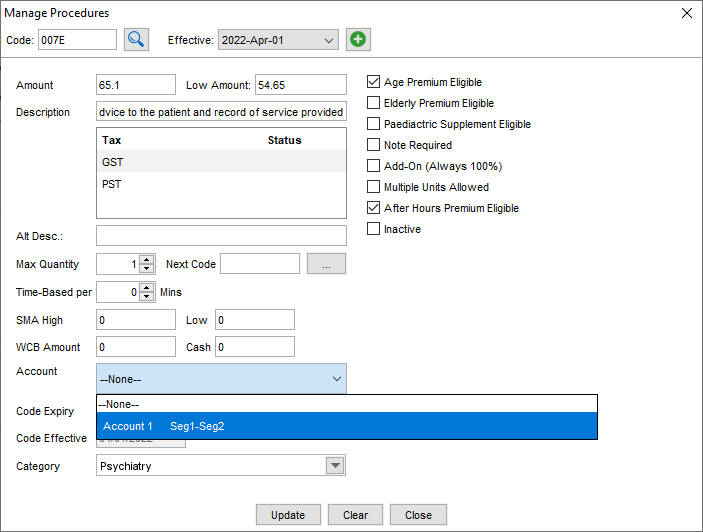
Add Procedure Codes to Service Code Account
Press and release Alt button on the keyboard or click the Accuro Start Menu Button , click Billing and select Billing Options from the list displayed.
Click Manage Procedure Codes. The Manage Procedure Code window is displayed.
Search and select the desired Procedure Code.
Click the Account dropdown and select a Service Code Account from the list.
Select Update.
Remove a Service Code Account
Press and release Alt button on the keyboard or click the Accuro Start Menu Button , click Billing and select Billing Options from the list displayed.
Click Service Code Accounts. The Service Code Account window is displayed.
Click to select the appropriate Service Code Account and click the Remove button . The selected Service Code Account has been removed.
Access Service Code Account Payments Report
Press and release Alt button on the keyboard or click the Accuro Start Menu Button , click Reports and select Reports from the list displayed.
Under the Billing section click Service Code Account Payments
Manage Billing Numbers
Add and remove billing numbers used to configure Payee Numbers on Provider Billing Details in the Provider Wizard (F2).
Add a Billing Number
Press and release Alt button on the keyboard or click the Accuro Start Menu Button , click Billing and select Billing Options from the list displayed.
Click Manage Billing Numbers. The Edit Billing Numbers window is displayed.
Click the Add button .
Type in the Billing Number and click OK to save.
Remove a Billing Number
Press and release Alt button on the keyboard or click the Accuro Start Menu Button , click Billing and select Billing Options from the list displayed.
Click Manage Billing Numbers. The Edit Billing Numbers window is displayed.
Click to select the appropriate Billing Number and click the Remove button .
A confirmation message is displayed, click Yes to proceed. The selected Billing Number has been removed.
Manage Claim Tracking
Create, edit, and remove Claim Tracking Pins. Note: Claim Tracking Pins are not shared between offices; each office has its own tracking pins.
Add a Claim Tracking Pin
Press and release Alt button on the keyboard or click the Accuro Start Menu Button , click Billing and select Billing Options from the list displayed.
Click Manage Claim Tracking. The Edit Claim Tracking Pins window is displayed.
Click the Add button .
Type the pin name and abbreviation.
Click the Select Color button and choose the pin icon color.
Click OK to save and Close to close the Edit Claim Tracking Pins window.
Edit a Claim Tracking Pin
↵
Press and release Alt button on the keyboard or click the Accuro Start Menu Button , click Billing and select Billing Options from the list displayed.
Click Manage Claim Tracking. The Edit Claim Tracking Pins window is displayed.
Click to select the appropriate pin and click the Edit button .
Edit the pin as required.
Click OK to save your changes and Close to close the Edit Claim Tracking Pins window.
Remove a Claim Tracking Pin
Press and release Alt button on the keyboard or click the Accuro Start Menu Button , click Billing and select Billing Options from the list displayed.
Click Manage Claim Tracking. The Edit Claim Tracking Pins window is displayed.
Click to select the appropriate pin and click the remove button .
A confirmation message is displayed, click Yes to proceed. The pin is removed.
Procedure Code Lookup
The Procedure Code Lookup enables a search to be made for a service code by typing in either the service code or a keyword.
Press and release Alt button on the keyboard or click the Accuro Start Menu Button , click Billing and select Procedure Code Lookup from the list displayed.
Type in either the Code or Keyword and click the Search button . To view codes you use, click the MyCodes tab.
Click OK to close the dialog.
Manage Insurers
Create, edit, and remove private insurers.
Add an Insurer
Press and release Alt button on the keyboard or click the Accuro Start Menu Button , click Billing and select Manage Insurers from the list displayed.
Click the Add button . The Insurer window is displayed.
Complete the insurer details as fully as possible and click Add to save any changes.
Click Close.
Edit an Insurer
Press and release Alt button on the keyboard or click the Accuro Start Menu Button , click Billing and select Manage Insurers from the list displayed.
Click to select the insurer being changed and click the Edit button . The Insurer window is displayed.
Edit the insurer details, as required and click Update to save any changes.
Click Close.
Remove an Insurer
Press and release Alt button on the keyboard or click the Accuro Start Menu Button , click Billing and select Manage Insurers from the list displayed.
Click to select the insurer to be removed and click the Remove button .
A confirmation message is displayed, click Yes. The Insurer is removed.
Inactive Insurers
Inactive Insurers are not displayed in the Address Book unless the 'Show Inactive Insurers' is selected. If the 'Show Inactive Insurers' checkbox is selected, inactive insurers are displayed in red.
To access the 'Show Inactive Insurers' checkbox, follow the steps below:
Press and release Alt button on the keyboard or click the Accuro Start Menu Button , click Billing and select Manage Insurers from the list displayed.
The Show Inactive Users checkbox is displayed at the bottom of the Manage Insurers window.
Configure Billing Periods
Add, edit, delete, open, and close billing periods for the Billing Periods feature.


 , click Billing and select Default Billing Percent from the list displayed.
 . The Billing Rule window is displayed.
 and select the type of rule from the list displayed and click OK.
 .
. on the Navigation bar, select the Daily Claims tab, right-click the appropriate Claim, and select New Bill from the list displayed.
 .
. to move it into the Category.
 or right