MC EDT Connection (ON)
Prerequisites
Please contact the MOH to apply for MC EDT by phone at 1-800-262-6524
- In order to complete this process, you must have a Go Secure ID and password.
- The ministry recommends that you use Google Chrome to access the Go Secure website https://www.edt.health.gov.on.ca
- Do not create a bookmark to go back to the MC EDT web page; this has been known to cause errors that prevent you from being able to log in.
- There are Settings in Google Chrome that you may want to set to help with using the web browser with Accuro and the Go Secure website (See Appendix at the end of this section)
- Alternately, instead of modifying the Google Chrome settings, you can begin to type in the URL above into the address bar of the internet browser, and once you have already visited the site once, the website will show up as on option to select from.
Create OHIP Submission File in Accuro
Note: This must be done before you connect to MC EDT.
To send an OHIP submission file you must first create the OHIP submission file in Accuro.
- In the Unsubmitted Claims tab (Claims > Unsubmitted Claims) select the correct Provider you want to submit for.
- Click the Submit Claims button. The Claims Exchange window is displayed. Make a note of the submission file name
displayed in the window:
- Minimize your active windows so that you can see your Windows Desktop, by clicking the Show the Desktop icon or holding down the Windows button
 on your keyboard; while holding it down, type the letter M.
Connect to MC EDT Service
Double-click on the Google Chrome icon on your desktop and Log In to MC EDT For detailed instructions please refer to the MC EDT Reference Manual available at: http://www.health.gov.on.ca/english/providers/pub/ohip/edtref_manual/mc_edt_reference_manual.pdf
Connect to MC EDT Service
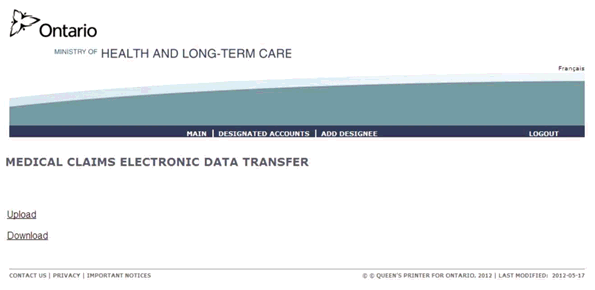
- After logging in, click MC EDT Service (Upload/Download) the following window is displayed.
- Click Upload to send your claim file(s). The File Upload window is displayed.
- If the Select a Billing number field is blank, click on the dropdown and select the appropriate Physician Billing Number.
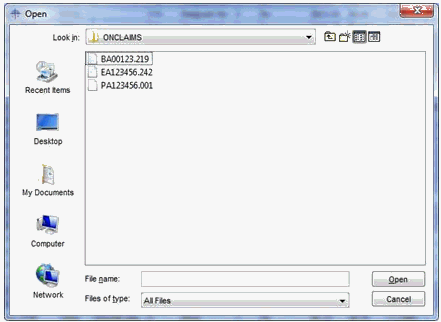
- Click Choose File, the Open window is displayed.
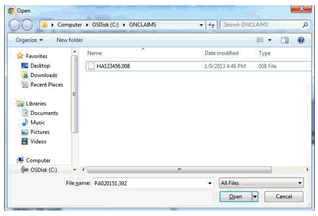
- If the location at the top of the window is not “Computer \ C: \ONCLAIMS” then navigate to C:\ONCLAIMS by:
- Click on Computer on the left side.
- Click on your (C: ) drive.
- Click the ONCLAIMS folder
- Double-click on your submission file.
- Once the file has been selected, click the Select File Type dropdown and select Claim File.
- Click on Upload. Make sure to see the confirmation message similar to the following: File ‘HA123456.008’ has been successfully uploaded.
- If you have more than one file to send, click Upload Another File and repeat this process until all claim files have been sent.
- When completed, click Home.
Receive Files (Download) From the Ministry (ON)
-
Click Download. A window similar to the one below is displayed.
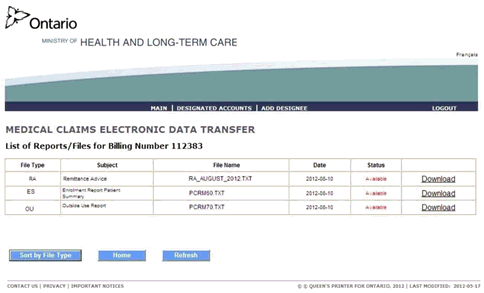
Note: If you are authorized for more than one provide select the appropriate Provider from the Physician dropdown and then click Download to get to the window displayed above.
-
Download all files that are Status ‘Available’. Click the Download link next to the file you want to download. If the location at the top of the screen is not C:\ONCLAIMS navigate to C:\ONCLAIMS by:
-
Click Computer on the left-hand side.
-
Click your (C:) drive.
-
Click the ONCLAIMS folder.
-
Click Save, if required. (Based on your Internet settings).
-
Repeat the process until you have downloaded all files with the status 'Available'. If you have more than one Provider you will click on “Select another Billing Number” to repeat the process for all of your providers.
Note: You will not see the status change to Downloaded unless you press the Refresh button at the bottom of the window.
-
When finished, click Logout and close the browser.
After Connecting to MC EDT Return to Accuro
If you successfully uploaded your submission files, click Successfully Uploaded in the Claims Exchange window. If you were unable to log in or submit your claim files, click Cancel.
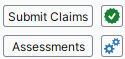
If you downloaded files, to process them, click on the Assessments button within Accuro in the Claims section.
A screen similar to the one below will be displayed:
Click on any file to highlight it. Hold down the Ctrl key and while holding it down, type A to select all files. Click on Open. The files will be processed into Accuro and removed from the ONCLAIMS folder.
To verify if your previous submissions have been processed by the Ministry, click on Manage Submissions (the gear icon to the right of the Assessments button).
Click on the “Batch Status” tab. All submissions that were marked as “Successfully Uploaded” in Accuro will be listed in here. Every submission line with a date prior to today should have a Processed Date. The Ministry generally releases the “Batch Edit” files within 24 to 72 after a submission has been completed. The Batch Edit files are what give the processed date in the Batch Status tab of Submission Management.
To verify if you have rejected claims and to correct them, click on the “Not Reconciled” tab.
Browser Settings for Google Chrome
If you choose to use Google Chrome as the Internet Browser with MC EDT, here are some settings that may assist you with using the browser with Accuro and the Ministry’s website:
- When you first launch Google Chrome, click on the icon on the far right of the address bar that looks like 3 dots.

- Then choose Settings.
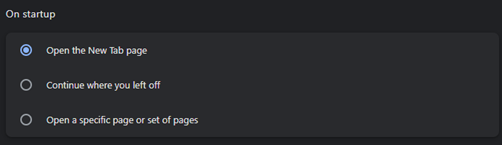
- Click On startup.
- Since sometimes creating a bookmark for the MC EDT website causes an error when logging in, you can avoid having to type the website each time by setting Chrome to open a specific page on start-up. Please find the setting below and click Open a specific page or set of pages.
- Type the MC EDT website as one of the pages to open on start-up:
https://www.edt.health.gov.on.ca
- Now if you close your browser and relaunch, it should open right to the GO secure website so that you may sign in.
- When you first launch Google Chrome, click on the icon on the far right of the address bar that looks like 3 dots.
- Then choose Settings.
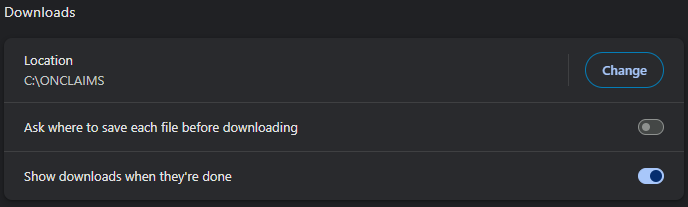
- Click Downloads.
- You can set up a default save location when downloading your claim files.
-
Click Change and ensure that the Download location is C:\ONCLAIMS.