SK Chronic Disease Management (CDM) Data Query User Guide
OVERVIEW
As part of the SK Chronic Disease Management (CDM) - Quality Improvement Project (QIP), queries have been developed to help report on information collected about patients. These queries are created using the existing Accuro Query Builder functionality.
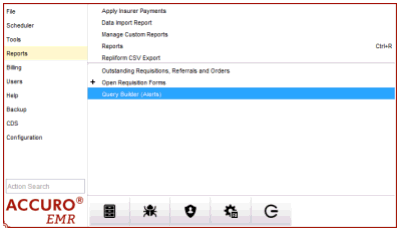
- From the Accuro Menu go to Reports > Query Builder (Alerts).
- Next, the queries will need to be downloaded. To do this there will be a small Alerts Publisher icon
 at the bottom of the query builder window.
- The queries then need to be found in order to be downloaded. All have been published under the user “CDMQIP”. To single out these queries it is best to use a series of “%” signs which act as wild card characters in the search field and select the publisher CDMQIP from the dropdown. Below is what the screen should look like.
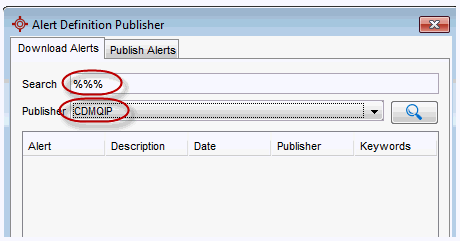
- Next click the magnifying glass icon to search.
- Each query now needs to be downloaded individually.
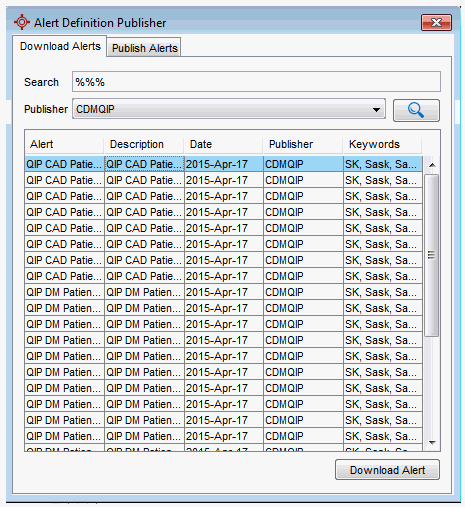
- Select one row at a time, then click the “Download Alert” button. Once you have finished the Publisher window can be closed using the “X” in the upper right.
QUERY USE:
- Once the queries have been downloaded they will appear in your Definitions list at the upper left of the Query Builder Window. All queries are listed alphabetically in this list. Selecting one will then display the Rules that it is made up of, as well as the logic being used.
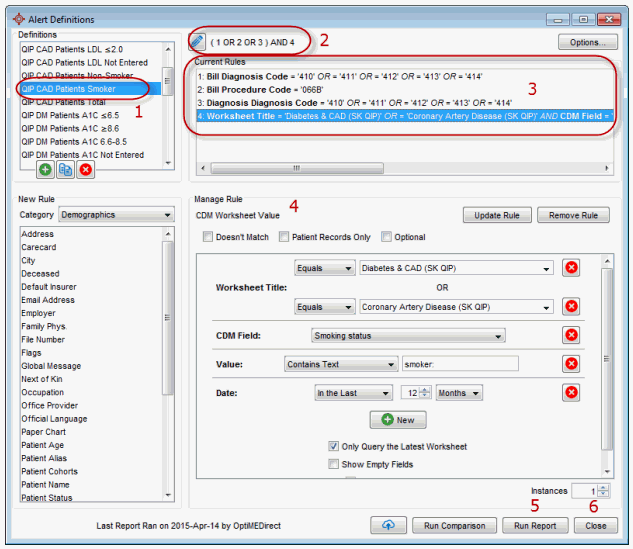
- Definitions List
- Logic (if not simply “AND” between rules)
- Rule List
- Management of Rules
- Button Used to run the report
- Close out of Query Builder
- Once a query is selected the “Run Report” button can be selected.
- Next an intermediary window will display similar to the screen below.
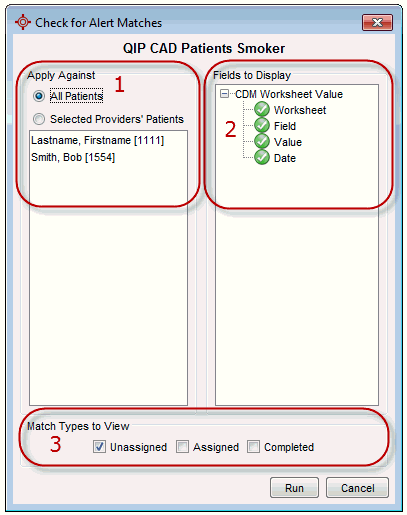
- Allows you to select which patients the query is run against. Filtering by “Selected Providers’ Patients”, then a Provider, will only apply against those patients with the selected Provider listed in the “Office Provider” field of the demographics. If “All Patients” remains selected this will apply the query against all patients regardless of the entry in the Office Provider Field. For more information on how to assign office providers please see the directions in the Appendix of this document.
- The “Fields to Display” area indicates the columns that will display in the result in addition to basic patient demographics. Clicking the green check icon, will turn it to a red x indicating it will not appear in the results.
- This section is specifically for assigning alerts and can be ignored for purposes of these queries.
- Once the appropriate selections have been made the “Run” button can be selected.
- Now a new window will appear with the results.
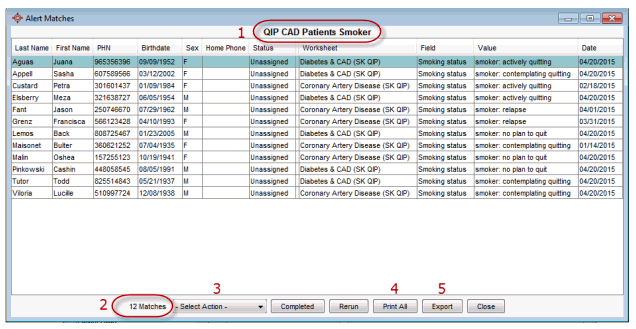
- The name of the Query
- Total number of matches in list
- List of actions, these include: Create Task, Apply Vaccine, Create Notes, create Forms, Create Bill, Set Patient Status, Assign Flag, Assign to Patient Cohort, or Create Patient Cohort. Each only applies to the highlighted patients in the list. Hold the Ctrl key to select multiple patients, or click and drag.
- Print all will print a comprehensive list of all results in list. (Warning, for all but the simplest patient lists there will be multiple sheets of paper used to account for all columns)
- Export, this exports a CSV (Comma Separated Value) version of the report. This format is most commonly opened using Excel. Export before printing gives the user more freedom in the information that is printed and usually preferred.
APPENDIX
Setting Office Providers
To be able to use the built in functionality to query by office Provider, office providers have to be assigned to each patient. There are several ways to do this.
- In the demographics screen of Accuro simply select the ellipsis (“…”) button next to the office Provider field and search for the appropriate physician. Once the correct Provider appears, click on them to select and click the “Select” button. This would have to be done for each patient.
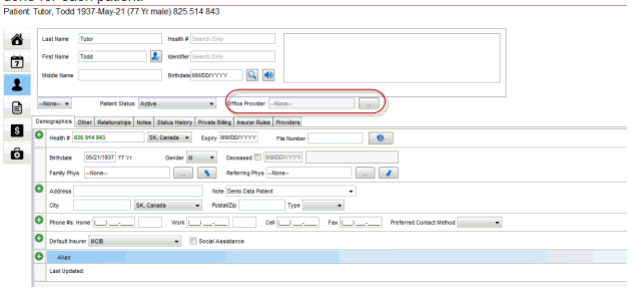
- Using a built in tool there is the ability to mass adjust the office Provider based on one or more rules. To access this tool the user must have the Administrator role in Accuro, then open the Accuro menu by using the Alt key or selecting the Accuro icon in the lower left of the window. Next select tools > Office Provider Assignment.
You should see the following window.
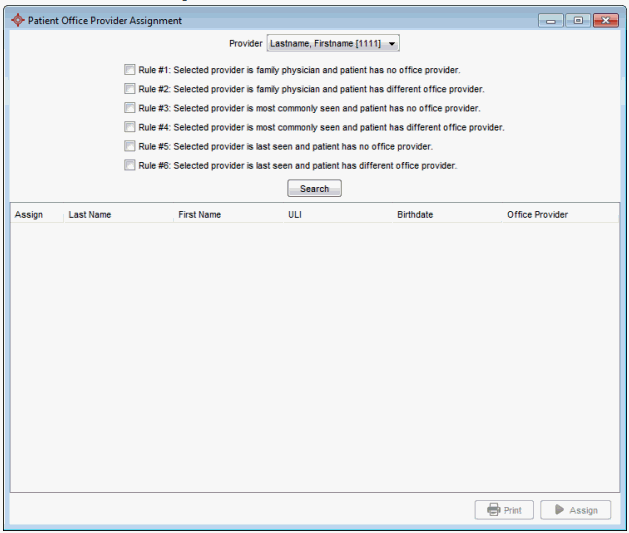
At the top of the window the Provider is selected as to which Provider you wish to do the assignment for.
Next the applicable rule(s) are selected, note these rules do not compound where both have to be satisfied before the patient appears in the list. Once the selections are made a list of patients is presented. Patients can then be manually excluded by deselecting the “assign” checkbox.
Once the applicable patients are selected use the “Assign” button to assign the Provider.
Repeat for each Provider as necessary.
QUERY METRICS
Please see the SK CDM-QIP Data Query Metrics Document

 at the bottom of the query builder window.


 at the bottom of the query builder window.


