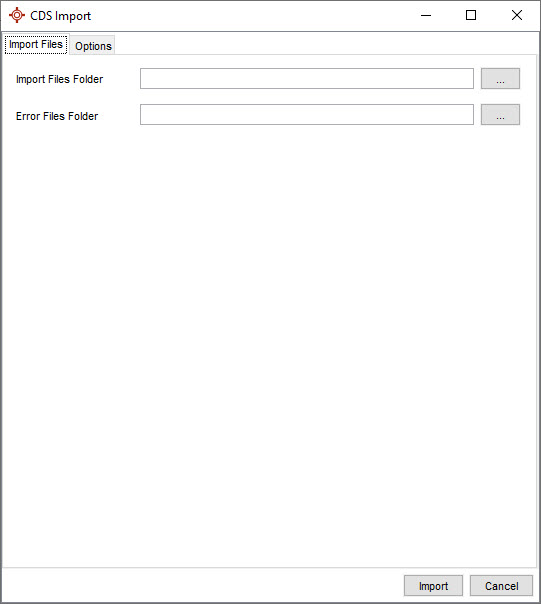
 at the bottom left of your window. Click File and then Import. Select the appropriate CDS Import version. The CDS Import window is displayed.
Please note you will need System Administrator permissions to run a CDS Import.
It is essential to prepare for an import; a separate folder should be created to store any error files (if there are any after the import). This folder should be in a different location from the folder containing the files being imported and not contained within the import files path at all. An example of the pathnames that Accuro recommends for the import are:
Import Files Folder: C:\OMD\CDSv5Import
Error Files Folder: C:\OMD\Errors
The Error Files folder is created in a separate location is because if any XML files have an error during processing, they are copied to the Error Files folder. The import process picks up all files (and folders) in the import folder (including the Error Files folder) as it traverses the folder. Therefore, if the Error Files folder exists within the import folder, there is the risk that the errors files will be processed again.
Create the Error File folder prior to staring the import. This must be in a different location to the folder containing the files being imported and not contained within the import files path at all
If you are unsure how or where to create the Error Files folder, please contact your clinic’s IT Department or IT person.
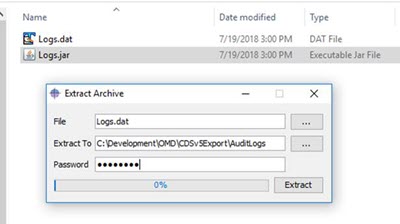
Imports containing patient’s PI and PHI must always be secure, therefore the files you have received will probably be encrypted.
Find out what type of encryption the files have and ensure you have the appropriate software installed. When encryption is used to export the files being imported, the files must be decrypted in the file system prior to attempting an import. For more on encryption, see below.
The CDS Export window is accessed by clicking the Accuro Start Menu at the bottom left of your window. Click File and then Import. Select the appropriate CDS Import version. The CDS Import window is displayed.
Depending on how you have received the files being imported, you may need to copy them into a secure folder on your computer or server prior to decryption starts. If you are unsure how to do this, please contact your IT department or IT person.
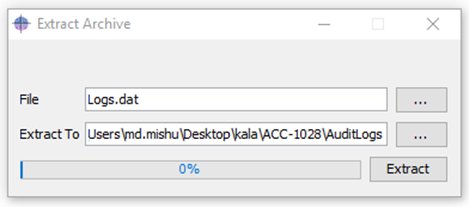
A.jar file is created which holds the data and a .dat file to describes the type of encryption. To decrypt:
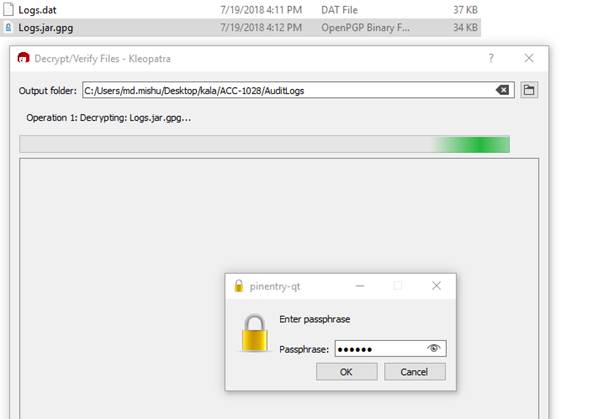
When decrypting PGP, the PGP decrypting software is required. If you do not already have it installed on your computer, it can be downloaded from this website: https://www.gnupg.org/download/index.html
Import Files Folder: this is the location of the CDS files being imported. If the data was split into multiple folders during the export, all the folders can be placed in the Import Files Folder as sub-folders and the import will go into each one automatically.
Error Files Folder: this is the folder that will contain any files that failed during the import. This folder must be created prior to the import and must be in a different location to the Import Files Folder and not contained within the import files path at all
Options for how the import will handle certain situations or import files are available in the Options tab. Overwrite Existing Patient Demographics, Attach Import Log to Patient’s Chart and Set Appointments Without Duration to Bill-Only are selected by default.
Overwrite Existing Patient Demographics: When a match is found to an existing patient and this option is enabled, the patient’s demographic information is updated to what exists in the import files. Patient demographic information may include name, gender, chart number, health card number, addresses, phone numbers, etc.
Attach Import Log to Patient’s Chart: If this option is enabled, the import log file for each patient which has a CDS record to import will be attached to the patient’s chart and available in Accuro.
Set Appointments without Duration to Bill-Only: Appointments that do-not have a duration are saved as bill-only.
Use Lab Collection Date as Observation Date: If this option is enabled the Observation Date is the same as the Lab Collection Date.
Mark Labs as reviewed: If this option is enabled labs between a specified date range will be marked as reviewed as part of the import process.
Check for CDS files that have already been processed: If selected Accuro will check to make sure the CDS file hasn’t already been imported.
Search Office Providers First When Matching Providers: If selected this instructs Accuro to use the Office Providers first when they are matching to Providers.
Default Office Provider for Appointments where a Provider is not specified: Allows you to select a provide that will be assigned to any appointments that don’t have a specified Provider.
Profile: This is where you select User or Data. If Data is selected select the source of the date being imported. If it is from another instance of Accuro, select Accuro-to-Accuro, otherwise select the software product the data originated from (e.g. Alpha global, Nightingale etc.).
Check the error log and look in the Error Files folder. Any files that generated an error during the import will have been saved to the Error Files folder created before the import. If there is any indication that errors and/or warnings were created during the import, please contact Accuro for further guidance.